Friday, September 30, 2011

Repurposing a 1970's Record Cabinet

Hi everyone!! Today I'm going to share my brand new storage cabinet with you!! I'm so thrilled with the way this turned out that I couldn't wait to share it with all of you! I'm going to show you the before pictures, and than the after. The story behind this record cabinet...our elderly neighbor passed away last December and they just had the estate sale a couple of weeks ago. We were walking around in the basement and here stood this little cabinet all by itself off over in the corner. Now when I saw this little cabinet, I could envision it painted white, to match all of my furniture in my scrapbook room. I've been on the hunt for a cabinet to hold all of my larger Sizzix dies that I've gotten the last couple of years, but I also wanted a place to put my Big Kick on so that I could just go and grab a die and run it through my machine, all in one place, instead of being spread all over in my craft room. When I saw this I hoped that it would work and it was for sale for only $10.00. So my husband asked if there was anything there that I wanted and I showed him this cabinet. He said will wait until tomorrow (half price day), he said he didn't think anyone else would even be interested in it. So first thing the next morning we walked across the street and I made a bee-line to the basement, and yep, it was still there!! Oh boy was I ever so happy, but before I bought it, I took the extra-long die that I had brought with me to see if it would really work for what I wanted and....YES!!!! it did!! So I hubby carried it upstairs for me and I laid my $5.00 on the table to pay for my treasure (the cashier just looked at me like, "really, you are buying that ugly thing?") So I got it home and started working on it that afternoon.


As you can see, it was pretty ugly, even had to wipe off the cobwebs...


Yes, there is a small piece missing on the left, but I can work around that, no problem.


As you can see the top was in very sad shape, it looked like they had used it to store laundry soap on it. The metal feet had rusted too.


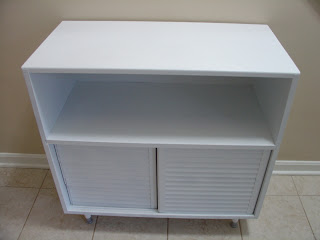
After sanding it, wiping it down, I primed with with spray paint...


Than use Rust-oleum white satin spray paint to finish the cabinet with. Didn't the top turn out nice!!? Look at all that storage underneath! I even taped off the metal and spray painted them silver.


Here it is in my craft closet holding my Big Kick and all of my dies too!


In the space behind the doors, I have some of my crafting supplies, all nice and put away!!


Now if I were to do alot of repurposing of ugly/old furniture, I would invest in a paint sprayer because it did take three cans of primer and three cans of the Rust-oleum. I did get the paint at Wal-Mart so I did save there. So for around $30.00 dollars, I got a nice piece of furniture and I know Frank and Dorothy would both be pleased that it is still being used!!


Tuesday, September 27, 2011

Grandma "D" Meatloaf

Hi too all of you! Since the weather has been on the cool side here, I've started cooking more, which makes my hubby very happy these days! Today I'm going to share my recipe for my Grandmother's meatloaf. It is the best, well my family thinks so, in fact, they get down right mad if I even mention that I would like to try a different recipe! So you will have to be the judge on if you like it or not. I can understand why some people don't like meatloaf after taking pictures of making it for the blog, doesn't look the yummiest, but boy it sure is yummy after it is cooked!!
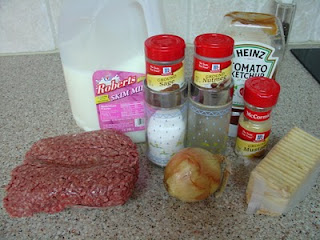
OK, here we go. In a large bowl, add--eggs, milk (I mix them together first),cracker crumbs, onion, salt, pepper, sage and ground beef.

Mix all together really well, I use my hand, but only my right hand, in case the phone rings, got to be able to answer it! Now put it into a greased (I PAM mine) loaf pan.
Set it aside while you mix the topping ingredients together. In a cereal bowl, add sugar, nutmeg and dry mustard. I mix this until there are no lumps of dry mustard left.
Than add your ketchup. Mix well.
Now pour and spread it all over the top of your meatloaf.
Bake for the time stated. After it is done, take a turkey baster and remove any grease that has collected in the bottom of the pan.
Let set for 5 to 10 minutes to let the juices settle in the meat. Cut and serve.
Hmmmm......now doesn't that just make your mouth water?!! Oh and my hubby just loves to use the leftovers for meatloaf sandwiches! Enjoy. Oh, I will share my mashed potato recipe with you soon.
Meat Loaf
2/3 cup cracker crumbs
1 cup milk
1 1/2 pounds ground beef (I use 93% lean)
1/4 cup chopped onion
2 eggs, slightly beaten
1 teaspoon salt
1/8 teaspoon pepper
1/2 teaspoon ground sage
Mix all together and pat into a greased 9" x 5" x 3" loaf pan. Set aside and make topping.

Topping
3 Tablespoons sugar
1/4 cup ketchup
1/4 teaspoon nutmeg
1 teaspoon dry mustard
Mix together and pour over meat loaf.
Bake for 1 hour and 30 minutes at 350 degrees.

Saturday, September 17, 2011

Good-bye to Our Sweet Molly

Good-bye, sweet Molly we will all miss you so much. You were our gentle giant and you gave us unconditional love for the last 12 1/2 years. We were so lucky to get you from the family that could no longer keep you and you brought so much joy and happiness into our lives. Now you and Samantha can run and play, once again, with each other. Until we see you again, love you mu;ch.

Love from your human "pack".


Sunday, September 11, 2011

Remembering 9-11

A short video I would like to share with you http://www.youtube.com/watch?v=s7b2ZTlWiOg&feature=player_embedded

Mary


Baked Potato Bag


Do you have trouble making a really good baked potato in your microwave? Boy I use to, until my mom told me about these baked potato bags. My mom received one of these bags from her granddaughter, Jennifer, last year and was just going on about how good your potato comes out. Well, I don't know about all of you but when I try to make a potato in the microwave it either comes out all shrivel up or still hard in the middle. So when I got home from her house, I did a "google" search and found all kinds of ideas on these bags. I must say though, that after reading what some people had to say, I was also scared to try these in the microwave too! I guess if you don't use the right kind of fabric/batting, they can start a fire or scorch! Hmm....
Well as you can see I decided to give it a go and hope my husband didn't kill me for messing up the microwave.

YOU MUST USE 100% COTTON FABRIC, COTTON BATTING, COTTON THREAD and COTTON FLANNEL. This is very important in making these bags. They also suggested that you only use them in microwaves that have a turntables too.
You can make sweet potatoes, corn on the cob. You can reheat biscuits, rolls, tortillas, sweet rolls, etc.

To make your potatoes: wash the potato and dry with a paper towel, wrap the potato in the damp paper towel you just used. DO NOT POKE HOLES IN THE POTATO. Pop into the bag and put in microwave. Bake for 4 to 8 minutes, depends on the size of your potato, checking every 2 minutes and turning the bag over every 2 minutes, until you squeeze it and feel it give some. I let mine sit in the bag for 2 minutes after removing from the microwave. DO NOT use the bag over and over to cook many potatoes. The bag may overheat and scorch or start a fire. Heat it only ONCE, then let cool COMPLETELY before using again. Wash the bag if soiled, dry before using. Do not use fabric softener.

Here is where I found the directions for making my baked potato bags:
http://www.threadsmagazine.com/item/5585/baking-potato-bag

Now I've made my bags two different ways, one with the cotton batting and one with cotton flannel fabric. The two that I made with cotton batting I gave to my daughter to have. Than I looked at my mom's and the one she had didn't have any cotton batting in the middle, her's just had cotton flannel fabric on the inside and cotton fabric on the outside, so that is what I did with the ones in the pictures.
You can make these bags to any size you would like, the one's in the pictures are small, just right for one potato for a single person. I cut the material at 9" x 16".

I must say that the ones we had last night for supper were very good! Of course, that was after I put about 1/4 stick of butter and some sour cream on mine!!
To see a video on how to use one of these bags go to this link and scroll down:
http://www.potatobakingbag.com/index.htm


Thanks for stopping by to see me!!
Mary

{Printer Friendly Version}

Friday, September 9, 2011

How to Separate Eggs with a Funnel

Hi everyone!! I hope you all are finally cooling down, we are here in the Midwest this past week and it was wonderful!! Now that the weather has cooled down some I will be doing more cooking and hope to share some of my homemade creation will all of you. But for now, I wanted to share with you a cool tip that I found at Stacy Makes Cents HERE. This seems like a very useful tip and I hope you all find it helpful too!

Thanks for stopping in to visit with me, have a great week-end! Mary

Monday, September 5, 2011

Happy Labor Day


I hope you all have a safe, happy week-end filled with lots of good food!!


Mary