I saw this video on a follower blogger blog and I just had to share it with all of you!
http://bbs.wenxuecity.com/cooking/1160651.html
The video is not in English but you will be able to understand it just by watching it.
Hope your week if off to a great start! Happy Cooking, Mary
Monday, August 27, 2012


Saturday, August 25, 2012
Chewy Toffee Almond Bars
Hi! I'm back with another recipe. We had a break in the hot weather recently and I decided it was time to turn the oven on, poor thing, hasn't been used all summer long!
I was going thru my cupboards to see what I had (usable) on hand and found a bag of Heath Bits 'O Brickle toffee bits from Christmas time. So I decided to make this recipe.


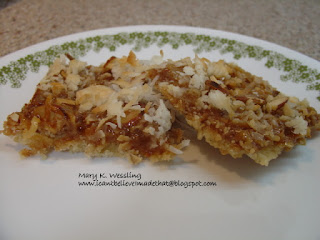
I was going thru my cupboards to see what I had (usable) on hand and found a bag of Heath Bits 'O Brickle toffee bits from Christmas time. So I decided to make this recipe.

Mix together the sugar and flour until fluffy.

Then add flour, beating until well blended.

Press into cookie sheet. You need to grease ONLY the sides.

This was the hardest part! Bake at 350 degrees for 15 to 20 minutes, until lightly browned. Set aside. Forgot to get a picture of it baked.

Combine the toffee bits and light Karo syrup (which I didn't have, so I used dark).

Cook over medium heat, stirring constantly, until toffee is melted (about 10 to 12 minutes). Add 1/2 cup coconut and 1/2 cup almonds.

Spread toffee mixture to within 1/4 inch of crust.

Sprinkle remaining 1/2 cup almonds and 1/4 cup remaining coconut over top.

Bake an additional 15 minutes or until bubbly. Cool completely in pan on wire rack.

Cut into bars. These are so good that they will be put on my Christmas platters for the neighbors this year.

Chewy Toffee Almond Bars
1 cup (2 sticks) butter, softened
1/2 cup sugar
2 cups all-purpose flour
1-1/3 cups (8oz. pkg.) Heath Bits 'O Brickle Toffee Bits
3/4 cup light corn syrup
1 cup sliced almonds, divided
3/4 cup sweetened coconut flakes, divided
Heat oven to 350 degrees. Grease sides of 13"x9"x2" pan. Beat butter and sugar until fluffy. Gradually add flour, beating until well blended. Press dough evenly in prepared pan. Bake 15 to 20 minutes or until edges are lightly browned. Meanwhile, combine toffee bits and corn syrup in medium saucepan. cook over medium heat, stirring constantly, until toffee is melted (about 10 to 12 minutes). Stir in 1/2 cup almonds and 1/2 cup coconut. Spread toffee mixture to within 1/4 inch of edges of crust. Sprinkle remaining 1/2 cup almonds and remaining 1/4 cup coconut over top. Bake an additional 15 minutes or until bubbly. Cool completely in pan on wire rack. Cut into bars. About 36 bars.
Well I hope you give these a try, they are very good! Mary
Friday, August 17, 2012
Southwestern Chopped Chicken Salad

Well long time no see to all of my followers! I hope your summer has been going well with all of you and you have not all dried up either! What a summer this has been, huh!?
Well, if any of you are like me, you like to snoop cruise around on Pinterest and find new and great things to pin to your boards. I found this recipe last week on one of my friends boards and decided to give it a try and I'm glad that I did too! I found the original post HERE. The morning I decided that I was going to make this, my chicken breast were still in the freezer, rock hard. So I ran some warm water over them to break them apart and then put them in my crock-pot with just enough water to cover the bottom, set it on HIGH and let them cook until I got home from work around 12:15 (total of four hours). Oh the house smelled sooo good too! Than I got busy and started chopping all of the salad ingredients for this recipe. Oh, I removed the cooked breast from the crock-pot so that they could start cooling.


Here is a picture of the dressing. Very thick.

Here is a picture of the salad before everything is put together, looks yummy, doesn't it!

Here is a picture of the salad all put together, yummm!!
Now a few small details about this salad, do not mix it together until you are ready to eat, otherwise it will get soggy. My daughter and I had some the next day and it was still very good, but that was about as long as you could make it last. I would also use a small head of lettuce, which was not stated in the original recipe. I also served my chips whole and on the side, one less thing to go soggy.
Would I make this again, I sure would, it was very good but I would make sure to have less lettuce and a few more people for supper. I'm wondering if one could buy the ready made Ranch dressing and just measure out 1 1/2 cups and add taco seasoning to it and then just drizzle some of the dressing on the already tossed salad on individual plates, that way it shouldn't get soggy if you could not eat it all at one sitting. What do you think?
Southwestern Chopped Chicken Salad
Salad:
2 cups shredded chicken
1 small to medium green pepper, diced
1 can (15 oz) black beans, drained and rinsed
1 can (15 oz) corn, drained OR 1 cup frozen corn, thawed
2 Roma tomatoes, diced
4 green onions, sliced
1 small head iceberg lettuce, washed and chopped
1/4 cup cilantro, chopped
2 ripe avocados, diced
1 cup crushed tortilla chips
Dressing:
1/2 cup mayonnaise
2/3 cup Greek yogurt or sour cream
1 Tablespoon dry ranch dressing
1 Tablespoon taco seasoning
In a large bowl, combine all the salad ingredients together, tossing,except dressing and tortilla chips.
In a small bowl, stir all the dressing ingredients together. Stir to combine.
Add half of the dressing to the salad, tossing to combine. Gradually add more dressing until it is to your liking. Top with tortilla chips.
Serves 4 for dinner salad
Well there you have it, a really nice, healthy dinner! Mary
Monday, July 9, 2012
Crock Pot Baked Ziti

HERE is the link to this yummy recipe and you can also sign up for a chance to win a signed copy of the new crockpot cookbook too! The sign up is in the NOTES area at the bottom of the post.
Mary
Tuesday, July 3, 2012
Cheddar Bacon Dip

Hi everyone! It's been awhile since I've shared a recipe with you so I thought I would share this recipe that my daughter tried and she and her friends just went wild for it! It is so easy as you can see by the picture above, just four ingredients and 24 hours and you have delicious dip!
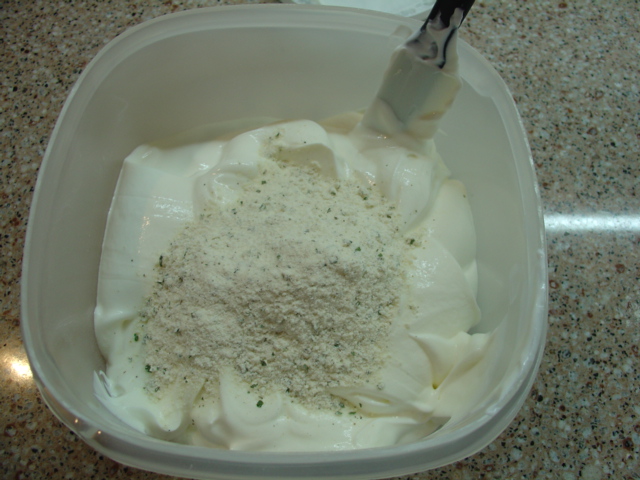
First put your sour cream in the fanciest dish you can find, hey people this is how regular, everyday people cook in my house, lol! Now dump in the Ranch dressing mix and mix well.

Now open your package of bacon bits and add to your sour cream and Ranch dressing mixture, mix it up some.

I decided to go fancy with this recipe and bought a block of Cheddar cheese and use my flat grater to shredded my cheese with.

Cheddar Bacon Dip
16 ounces sour cream
1 packet Ranch dressing mix
3 ounces bacon bits (in a bag, not jar)
1 cup shredded Cheddar cheese
Mix together and refrigerate 24 hours. Serve with chips and/or vegetables. Refrigerate any left-overs.
I found the recipe on Plain Chicken HERE.
Well I hope you all are staying cool and I hope you have a safe, fun fourth of July too! Mary
Friday, June 8, 2012
How to Prevent Moldy Berries
I received this e-mail this morning and thought I would share it with all of you. Disclaimer, I have not had time to try this for myself but it sure makes good sense!


Berries are delicious, but they're also
kind of delicate. Raspberries in particular seem like they can mold before you
even get them home from the market. There's nothing more tragic than paying $4
for a pint of local raspberries, only to look in the fridge the next day and
find that fuzzy mold growing on their insides. Well, with fresh berries just starting
to hit farmers markets, we can tell you how to keep them fresh! Here’s a tip I’m
sharing on how to prevent them from getting mold in the first place: Wash them
with vinegar. When you get your berries home, prepare
a mixture of one part vinegar (white or apple cider probably work best) and ten
parts water. Dump the berries into the mixture and swirl around. Drain, rinse if
you want (though the mixture is so diluted you can't taste the vinegar,) and pop
in the fridge. The vinegar kills any mold spores and other bacteria that might
be on the surface of the fruit, and voila! Raspberries will last a week or more,
and strawberries go almost two weeks without getting moldy and soft. So go forth
and stock up on those pricey little gems, knowing they'll stay fresh as long as
it takes you to eat them. you're so berry
velcome!
Tuesday, June 5, 2012
Strawberry Pretzel Salad
 Hmm....doesn't this look YUMMY!! It sure was yummy
to eat!
Hmm....doesn't this look YUMMY!! It sure was yummy
to eat!I found this recipe at Allrecipes.com. It has been years since I've had it and it is still just as good as I remember it. Now some people serve this as a sweet salad and some as a dessert. Either way, it's just plain GOOD!
Strawberry Pretzel Salad
2 cups crushed pretzels
3/4 cup butter, melted (this equal to 12 Tablespoons)
3 Tablespoons white sugar
1 - 8 oz. package cream cheese, softened
1 cup white sugar
1 - 8 oz. carton Cool Whip, thawed
2 - 3 oz. packages strawberry Jell-O
2 cups boiling water
2 - 10 oz. cartons frozen strawberries ( I use the sweetened ones), don't thaw
Preheat oven to 400 degrees. Stir together crushed pretzels, melted butter and 3 Tablespoons sugar; mix well and press mixture into the bottom of a 9" x 13" baking dish. Bake 8 to 10 minutes, until set. Set aside to cool. In a large mixing bowl cream together the cream cheese and 1 cup sugar. Fold in the Cool Whip; combine well. Spread mixture onto cooled crust. In another mixing bowl, dissolve Jell-O in the boiling water. Stir until Jell-O has dissolved, than add the still frozen strawberries and allow to set briefly. When mixture is about the consistency of egg whites, pour and spread over the cream cheese layer. Refrigerate until set.
Serves 12
Now the next time I make this, I'm going to halve the recipe, as this makes too much for just two people to eat.
{Printer Friendly Version}
Try it and see for yourself how delicious this is and than you can decide, is it a salad or a dessert.
Thanks for dropping by......Mary
Sunday, June 3, 2012
No-Bake Salad Pizza
 With the days starting to get hotter, I thought this would be a good recipe to share, as you don't need the oven to make this pizza, perfect for the summer months! So easy, especially if you pick up pre-chopped vegetable off the grocery store salad bar, which I do sometimes.
I
found this recipe clear back in 1996 in a Fast and Healthy recipe book. You know the ones
that you look at when you are standing in line at the check-out lane at the
grocery store. I use to make this recipe alot when my girls were younger and
they really, really like this, well we all did! I always had to make sure and
cut the pizza so that we each had two pieces.
NO-BAKE SALAD PIZZA
1 cup (8 oz.) purchased spinach dip, I use ranch dip, use your families favorite*
1 (10 oz.) thin crust Italian bread shell, I've always use Boboli
1 cup chopped broccoli, or your favorite
1 cup cubed cooked chicken or turkey, in a pinch I use the canned chicken breast
1/3 cup sliced green onions, purple adds a nice color to this too
1 small tomato, seeded, chopped, you can use grape or cherry tomatoes, cut in half
Spread spinach dip evenly over bread shell to within 1/2 inch of edge. Top with remaining ingredients. To serve, cut into 8 wedges.
*Most of the time I don't use all of the dip, I just spread until I feel that it has cover the crust nicely.
{Printer Friendly Version}
Have a nice day....Mary
P.S. You may have noticed that I'm not doing step by step pictures right now, I found that I was running out of time and actually would not remember to take pictures of every recipe, so on some of my post you will see just the finished dish. Eventually, after the wedding, I should have more time to take pictures, so don't give up on me yet! I still wanted to share some of the great recipes I've used over the years, some are too good not to share!
Tuesday, May 29, 2012
Basic Deviled Eggs

Hmmm..your thinking, deviled eggs, everyone knows how to make deviled eggs,
but you would be suprised had how many people do not know how to make this
simple dish that seems to always be well received when you take them to a
gathering. I found this recipe at Southern Living Magazine back in 2002 and
everyone really seems to like the way they taste. I like them just plain and
simple, no fancy ingredients for me!
Basic Deviled Eggs
6 large eggs
2 tablespoons mayonnaise, no salad dressing
1 1/2 tablespoons sweet pickle relish
1 teaspoon prepared mustard, think French's
1/8 teaspoon salt
dash of black pepper
paprika for garnish, optional
Place eggs in a single layer in a saucepan; add water to depth of 3 inches. Bring to a boil; cover, remove from heat and let stand 15 minutes. Drain immediately and fill the saucepan with cold tap water. Tap each egg firmly on the counter until cracks form all over the shell. Peel under cold running water. Slice eggs in half lengthwise, and carefully remove yolks. Mash yolks; sprinkle with salt and pepper; toss yolks; add mayonnaise, sweet pickle relish, and mustard; stir very well, you want it to be a smooth texture. Spoon yolk mixture into the egg white. Garnish, if desired.
Now it is important that you make the deviled eggs while your eggs are still warm, the yolks absorb the flavors better while they are warm, they will not taste as good if you hard-boil the eggs one day and devil them the next day.
{Printer Friendly Version}
Basic Deviled Eggs
6 large eggs
2 tablespoons mayonnaise, no salad dressing
1 1/2 tablespoons sweet pickle relish
1 teaspoon prepared mustard, think French's
1/8 teaspoon salt
dash of black pepper
paprika for garnish, optional
Place eggs in a single layer in a saucepan; add water to depth of 3 inches. Bring to a boil; cover, remove from heat and let stand 15 minutes. Drain immediately and fill the saucepan with cold tap water. Tap each egg firmly on the counter until cracks form all over the shell. Peel under cold running water. Slice eggs in half lengthwise, and carefully remove yolks. Mash yolks; sprinkle with salt and pepper; toss yolks; add mayonnaise, sweet pickle relish, and mustard; stir very well, you want it to be a smooth texture. Spoon yolk mixture into the egg white. Garnish, if desired.
Now it is important that you make the deviled eggs while your eggs are still warm, the yolks absorb the flavors better while they are warm, they will not taste as good if you hard-boil the eggs one day and devil them the next day.
{Printer Friendly Version}
I hope you give this recipe a try, you will not be disappointed! Mary
Saturday, April 14, 2012
3-2-1 Cake
Hi everyone, did you think I had fallen off the face of the earth?! Sorry about not posting for so long, just haven't had time to take pictures and post to the blog. Hopefully things around here will calm down and I can share some recipes again and some crafts too! Today I want to share with you a recipe my friend Chanda from So NOT Betty! sent to me. She wasn't going to use it on her blog, so I will share it with all of you now!
 First you start with an Angel Food cake mix and a regular cake mix, doesn't matter what favor BUT one of them has to be Angel Food, that's because there are dried egg whites in it and that is important.
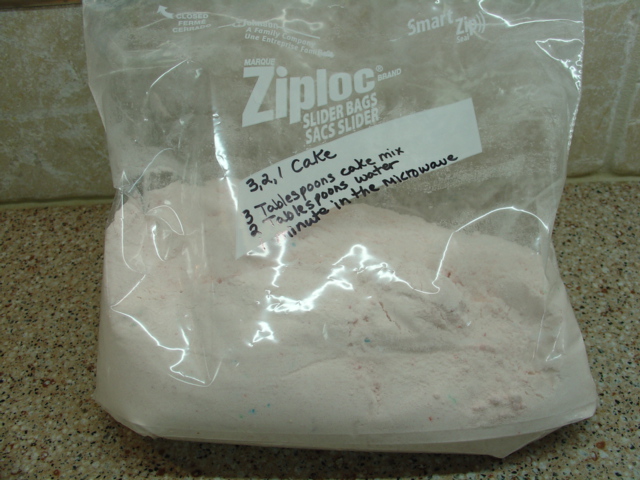
 Before I poured my angel food cake mix in, I wrote the cooking directions on the bag so I don't need to keep the recipe with it. Now pour in your Angel Food cake mix,
 then add your cake mix of choice, and mix both together well. That's it!! Now you are ready to make yourself a individual cake!
 I used a restaurant side dish that came home with us one time by accident and it worked perfect for this. I did measure and it holds 1/2 cup of liquid, so a little Pyrex dish would work well too. No, you don't have to grease it.
 Measure out 3 tablespoons of mix (can do this right in the dish you are going to microwave it in).
 Now add 2 tablespoons of water and mix it until well combined.
 Pour into your baking dish.
 Here it is before....
 Here it is after.
 Still hot.....
 Oops, sorry its blurry.
 Let it cool for 15 minutes before eating, taste way better after it has cooled, don't ask how I know this one! Here it is with some Reddi-Whip and some fresh raspberries on it, YUMMM!!!
 First you start with an Angel Food cake mix and a regular cake mix, doesn't matter what favor BUT one of them has to be Angel Food, that's because there are dried egg whites in it and that is important.
 Before I poured my angel food cake mix in, I wrote the cooking directions on the bag so I don't need to keep the recipe with it. Now pour in your Angel Food cake mix,
 then add your cake mix of choice, and mix both together well. That's it!! Now you are ready to make yourself a individual cake!
 I used a restaurant side dish that came home with us one time by accident and it worked perfect for this. I did measure and it holds 1/2 cup of liquid, so a little Pyrex dish would work well too. No, you don't have to grease it.
 Measure out 3 tablespoons of mix (can do this right in the dish you are going to microwave it in).
 Now add 2 tablespoons of water and mix it until well combined.
 Pour into your baking dish.
 Here it is before....
 Here it is after.
 Still hot.....
 Oops, sorry its blurry.
 Let it cool for 15 minutes before eating, taste way better after it has cooled, don't ask how I know this one! Here it is with some Reddi-Whip and some fresh raspberries on it, YUMMM!!!
It is very moist, which really surprised me, even hubby commented on this.
Well, I hope you give this a try, they are low in calories, if you don't add Reddi-Whip, lol!
3, 2, 1 Cake
1 box Angel Food cake mix
1 box cake mix, any flavor
In a zip-loc bag, combine the two cake mixes together, mixing well. For each individual cake serving, take out 3 tablespoons of the cake mix combination and mix it with 2 tablespoons of water in a small microwave-safe container.
Keep remaining cake mixture stored in the zip-loc bag and use whenever you feel like a treat! You can top each cake with a dollop of whipped topping and/or fresh fruit.
Try various flavors of cake mix like carrot, red velvet, pineapple, lemon, orange, strawberry, spice, etc. Just remember that one of the mixes has to be the angel food cake mix, the other is your choice.
{Printer Friendly Verison}
Thanks for stopping by! Mary
{Printer Friendly Verison}
Thanks for stopping by! Mary
Subscribe to:
Posts (Atom)